This post may contain affiliate links which may generate a small commission from clicks that result in a purchase.
If you’re a fan of Mediterranean cuisine, chances are you’ve come across recipes that call for pitted olives. Pitting olives at home may seem like a daunting task, but it’s quite simple and can save you money compared to buying pre-pitted olives. Pitted olives are more versatile in cooking and can be more easily preserved. Plus, it can be a fun and therapeutic activity with the right tools!
In this article, I’ll guide you on the different types of olives, the tools required for pitting, and the step-by-step process for pitting olives in 9 different ways. So, grab your favorite olives, and let’s get started!

I. Types of Olives
If you’re planning on pitting olives at home, consider the type of olive you’ll be working with. Green and black olives are two of the most common types you’re likely to encounter in recipes or at the grocery store.
Green Olives
Green olives are typically picked before they’re fully ripe and have a firmer texture than black olives. They range in color from light green to dark green and have a slightly more bitter taste than black olives. They are often stuffed with pimentos, garlic, or other ingredients.
| Green Olives | Origin | Characteristics | Recommended Method for Pitting |
|---|---|---|---|
| Manzanilla | Spain | Large and plump, mild and buttery flavor | Cherry or olive pitter |
| Picholine | France | Medium-sized and elongated, green-yellow color, slightly salty flavor | Cherry or olive pitter |
| Castelvetrano | Italy | Bright green color, meaty texture, buttery and nutty flavor | Knife and spoon method |
Black Olives
On the other hand, black olives are fully ripe and have been cured in saltwater or brine. They have a softer texture and a sweeter, less bitter flavor than green olives. They are commonly used in Mediterranean and Italian dishes.
| Black Olives | Origin | Characteristics | Recommended Method for Pitting |
|---|---|---|---|
| Kalamata | Greece | Purple-black color, salty and tangy flavor | Knife and spoon method |
| Niçoise | France | Small and dark in color, meaty texture, mild flavor | Cherry or olive pitter |
| Gaeta | Italy | Small and elongated, wrinkled texture, slightly bitter flavor | Knife and spoon method |
Remember, if you notice any spots on your olives, ensure they are safe and suitable for consumption – it’s always better to be safe than sorry when it comes to your health!
Methods Used to Pit Based on Olive Type
When it comes to pitting olives, the method you use can depend on the type of olive you’re working with.
- For green olives, a cherry or olive pitter can work well. Simply place the olive in the pitter and squeeze to remove the pit.
- For black olives, a knife and spoon method may be more effective. Simply place the olive on a cutting board, gently press down with the flat side of a knife, and then use a small spoon to scoop out the pit.
Regardless of the type of olive you’re working with, choose a method that works well for that specific type in order to avoid damaging the fruit. With a bit of practice, you’ll soon be able to pit olives with ease and confidence and enjoy the delicious results in your favorite recipes.
II. Tools Required for Pitting Olives
Pitting olives can be a bit of a challenge without the right tools, but with the right equipment, it can be a breeze. Here’s a rundown of the basic tools you’ll need to pit olives and some specialized tools that can make the process easier.
1. Basic Tools
Pitting olives doesn’t have to require specialized tools; in fact, many home cooks can pit olives easily using basic tools they likely already have in their kitchens. Here’s a list of the basic tools needed for pitting olives:
Cutting Board
A stable cutting board is necessary for pitting olives, as it provides a flat surface.
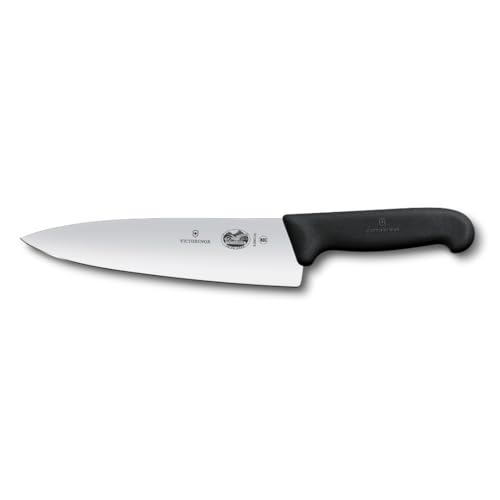
Sharp Knife
A sharp knife is needed to slice the olives open and remove the pits. A paring knife works well for small or medium-sized olives, while a chef’s knife can handle larger ones.
Small Spoon
Once you’ve sliced the olive open, scoop out the pit with a small spoon. A teaspoon or grapefruit spoon works well for this purpose.
With these basic tools, you’ll be able to pit olives easily and efficiently at home.
2. Special Tools
While pitting olives can be done using basic tools, there are also specialized tools available that can make the process faster and easier. Here are a few examples of specialized tools for pitting olives:
Cherry Pitter
A cherry pitter is a small handheld tool that is designed to pit cherries, but it can also work for pitting smaller olives. Simply insert the olive into the pitter and squeeze the handle to remove the pit. Cherry pitters are inexpensive and easy to find at most kitchen supply stores.
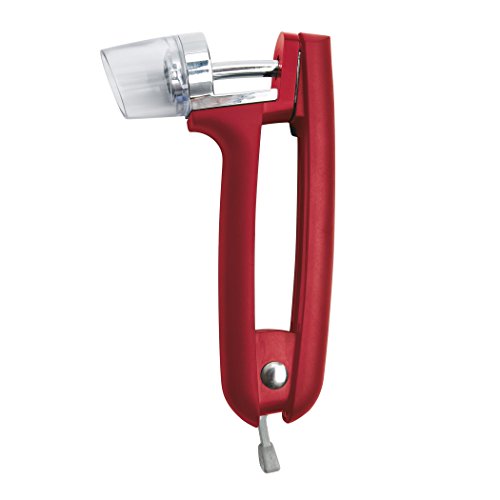
Olive Pitter
An olive pitter is a more heavy-duty tool that is designed specifically for pitting olives. It features a plunger that pushes the pit out of the olive, and can handle larger olives with ease. Olive pitters are more expensive than cherry pitters, but they can make the pitting process faster and more efficient.
Mechanical Pitting Machine
For those who process large quantities of olives, a mechanical pitting machine may be a worthwhile investment. These machines can quickly pit large quantities of olives and are used by commercial olive producers. They can be expensive, but they can save a lot of time and effort for those who process olives regularly.
No matter what tools you use, choose the correct method for the type of olive you’re working with. With a bit of practice and the right tools, you’ll soon be pitting olives like a pro and enjoying their delicious flavor in all your favorite dishes.
Searching for Premium Olive Oil?
Get OLIVIADA Olive Oil from Kalamata, GREECE!
III. How to Pit Olives?
For the olive pitting experiment, I use raw olives, the most popular Kalamata olives from Greece, and various kitchen tools. Also, I assess how easy or difficult is to use this method and which type of olives to use.
Here is a table with the olive pitting outcomes explained in more detail below.
| Method | Pros | Cons | Best for |
|---|---|---|---|
| Olive Pitter | Quick, efficient, and easy to use. | Large quantities of olives, and when speed is essential. | Large quantities of olives, and when speed is essential. |
| Knife | Small quantities of olives or recipes that require the olive to be whole. | Takes time, and there is potential to damage the olive or injure yourself. | No specialized tools are required, and very inexpensive. |
| Pot or Pan | Easy to use, and can split multiple olives in one go. | No specialized tools are required, and very inexpensive. | Large quantities of olives, but requires caution and precision. |
| Using Fingers | Small quantities of olives or when a fun and different approach is desired. | Can only be used with softer olives, may be messy, and can stain fingers. | No specialized tools are required, and very inexpensive. |
| Skimmer Spoon | Inexpensive and simple to use. | Only suitable for small or medium-sized olives and may not work with all varieties. | Small quantities of olives, or as a backup method when other tools are unavailable. |
| Straw | Could be messy, and olive may not look great after pitting. | Only suitable for small or medium-sized olives, and may not work with all varieties. | Small quantities of soft olives. |
| Decorating or Pastry Tip | Small quantities of olives or when a fun and different approach is desired. | Easy to use and can be a fun alternative to other methods. | Small quantities of olives or as a backup method when other tools are unavailable. |
| Tweezers | May be quicker than other manual methods, and can work well for small olives. | Can be difficult to separate the pit from the flesh, and may not work well for larger or firmer olives. | Small quantities of ripe, small olives. |
| Paperclip | Can work in a pinch, and no specialized tools are required. | Very time-consuming, may not work well for all types of olives, and can be messy. | Small quantities of olives, only as a last resort when no other tools are available. |
Note: The “Best For” column is a general guideline and may vary depending on personal preference and the specific type of olive being pitted.
Let’s look at these methods in detail on how to pit olives at home.
1. Cherry or Olive Pitter
- Efficiency Level: HIGH
- Best for Olive types: All varieties
The best option is to use an olive pitter. It can save you time and make sure the olives are in good condition with the minimum damage to the olive while removing the pit.
If you are searching for a pitter to buy, consider the size of the olives and look for one made with high-quality materials. Ensure it’s comfortable to use and easy to clean, and keep your budget in mind. By considering these factors, you’ll choose the right tool for the job and make pitting olives a breeze.
Here’s a step-by-step guide to using a pitter:
- Step 1: Choose the right pitter for the job. Cherry pitters work best for small or medium-sized olives, while olive pitters are better for larger olives.
- Step 2: Place the olive in the pitter, with the stem end facing down.
- Step 3: Squeeze the pitter handle to press the pit out of the olive. The pit will be ejected through the hole in the bottom of the pitter.
- Step 4: Remove the pitted olive from the pitter and discard the pit.
When using a pitter, it’s important to avoid damaging the olive. Make sure the olive is positioned correctly in the pitter before squeezing the handle, and don’t apply too much pressure, as this can cause the olive to crack or break.

Pros
- Fast and efficient: An olive pitter can quickly pit many olives without much effort.
- Easy to use: Most olive pitters are straightforward to use, even for beginners.
- Reduces waste: Using an olive pitter can reduce the amount of olive waste by cleanly removing the pit from the flesh.
- Preserves the olive’s shape: Using an olive pitter can preserve the shape and appearance of the olive, making it more aesthetically pleasing in dishes or as a garnish.
Cons
- Expense: Purchasing an olive pitter can be expensive, especially if you are looking for a high-quality model.
- Limited use: An olive pitter is a specialized tool only useful for pitting olives. It may not be practical if you only occasionally pit olives or have limited storage space for kitchen gadgets.
- May not work with all types of olives: Some olives, particularly large or irregularly shaped ones, may not fit in or work well with certain olive pitters.
- Can be difficult to clean: Some olive pitters can be challenging to clean due to their small size and the intricacies of their design.
This is an easy way to pit olives, but if you don’t own an olive pitter? Not to worry! There are still many other ways to remove pits described below!
2. Knife Method
- Efficiency Level: MEDIUM
- Best for Olive types: All varieties
If you don’t have a pitter, don’t worry, it is very easy to remove pits from olives using a large-bladed knife. When selecting a knife for pitting olives, choose one that is sharp and has a thin blade. A paring knife or a small chef’s knife works well for this purpose.
Using a knife method, you don’t cut into the olive with the knife; instead, you use the flat side of the blade. It might be best to start by doing one at a time using this method, and it does mean squashing the olive.
These are the steps for pitting olives with a knife:
- Step 1: Place the olive on a wooden cutting board.
- Step 2: Take a large bladed knife, such as a paring knife or a small chef’s knife, and hold it with the flat side of the blade.
- Step 3: Place the flat side of the blade on top of the olive and apply pressure with your dominant hand, pushing down firmly until the olive splits open.
- Step 4: Gently remove the pit from the olive using your fingers or a small spoon. Be careful not to damage the flesh of the olive as you remove the pit.
- Step 5: Repeat with the remaining olives.

You have to be a little bit careful using this method as oil can squirt out, and if you press too hard, the pit can break into pieces. But when you get the hang of it, you should be able to do quite a few at the same time. You should remember to wipe the blade regularly; otherwise, oil on the blade might allow an olive to slip out when you apply pressure.

Using a knife in the normal way to slice the olive freeing the pit, isn’t a great idea. It will be a slow process to remove, and even then, much of the olive will likely remain attached, wasting much of it.
Pros
- Knives are a standard kitchen tool that most people already have, so purchasing a specialized tool for pitting olives is unnecessary.
- Pitting olives with a knife allows for greater precision and control over the process since you can carefully slice open the olive and remove the pit without damaging the flesh.
- Using a knife can be a quick method for pitting olives, especially if you are experienced with using a knife.
Cons
- There is a risk of injury when using a knife, especially if you are not experienced with handling sharp knives.
- Pitting olives with a knife can be time-consuming, especially if you are pitting a large number of olives.
- If you are not careful, you may accidentally slice into the olive and damage the flesh, which can be unsightly and affect the flavor.
3. Pot or Pan
- Efficiency Level: MEDIUM
- Best for Olive types: All varieties
Did you know you can also use a pot or pan to pit olives? It might sound unusual, but it’s actually a fast and efficient method that doesn’t require any specialized tools. Here’s how to pit olives using a pot or pan:
- Step 1: Place the olive on a wooden cutting board.
- Step 2: Use a heavy stainless steel pot, saucepan, or frying pan to gently squish the olives one by one.
- Step 3: Once the olive is squished, use a small spoon or your fingers to remove the pit from the flesh.
- Step 4: Repeat with the remaining olives.
While using a pot or pan to split open multiple olives in one go might seem like a fast option, note that hitting olives with the heavy pot or frying pan could lead to them being launched across your kitchen with their pits still intact. Therefore, squeezing olives one by one is better to avoid accidents.
Using a heavy stainless steel pot or frying pan to squish olives effectively removes pits. I tried this method on a wooden cutting board and was surprised at how easy removing the pits from the olives was. So, if you’re looking for a fast and efficient way to pit olives without any specialized tools, try this method!


Last update on 2026-06-23 / Affiliate links / Images from Amazon Product Advertising API
Pros
- It’s a simple method that doesn’t require any specialized tools.
- It can be an efficient way to pit olives in larger quantities.
- The method is relatively easy to learn.
Cons
- There is a risk of damaging the olives if you hit them too hard with the pot or pan.
- The method can be messy, as the olive oil may squirt out while you’re hitting them.
- It may take some practice to get the right amount of pressure to split the olives without damaging them.
4. Using Fingers
- Efficiency Level: LOW
- Best for Olive types: Soft and Small
If you aren’t concerned about the aesthetics of the pitted olives (for example, if you are going to put them into the sauce or soup), you can simply use your fingers to remove the pit from the olive.
Here’s how to do it:
- Step 1: Hold the olive between your thumb and index finger.
- Step 2: Gently squeeze the olive until the pit pops out from the other end.
- Step 3: Remove the pit from the flesh using your fingers or a small spoon.
Tearing the olive or squeezing it will push the pit out, but this is only going to work on softer olives and not the firmer or meatier varieties. It is the simplest, non-tools least expensive method to pit olives.
However, keep in mind that tearing or squeezing the olive too hard can damage the flesh, so it’s important to be gentle. Also, this method can be messy and oily for your fingers and nails. So, if you’re planning to pit a large amount of olives, you might want to consider using a pitter or another method that’s more efficient.

Pros
- No need for any additional tools or equipment
- Simple and easy to do
- Can be done quickly for a small amount of olives
- No risk of damaging the olive with a tool
Cons
- Messy and oily for your hands
- Can be difficult or impossible for firmer or meatier olives
- Can be time-consuming for a larger amount of olives
- Risk of accidentally squishing or damaging the olive
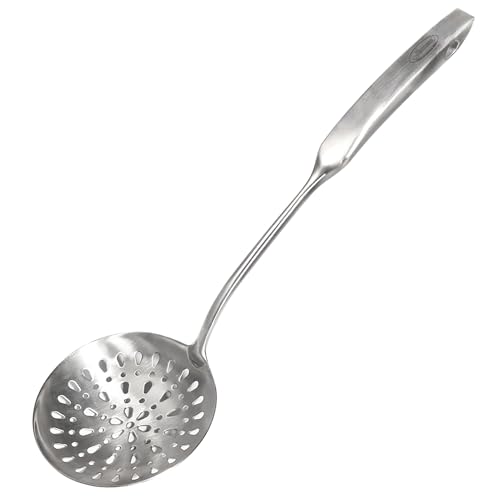
5. Skimmer Spoon or Meat Pounder
- Efficiency Level: MEDIUM
- Best for Olive types: All varieties
Using a stainless steel skimmer spoon or meat pounder allows you to split the olive to free the pit. Though since you are using a pounder, you have to be more careful not to smash the pit making the olive inedible.
Here’s how to do it:
- Step 1: Place the olive on a wooden cutting board.
- Step 2: Use a skimmer spoon or meat pounder to gently smash the olive until it splits open.
- Step 3: Remove the pit from the flesh using your fingers or a small spoon.
This method works well for softer olives, but be careful not to smash the pit and make the olive inedible. While smashing the olive with a skimmer spoon or meat pounder isn’t going to leave the olive looking great, it’s a quick and easy way to separate the pit from the flesh.
Once you have split the olive, you can nudge out the pit with your fingers if necessary. While this method may not be the most esthetically pleasing, it’s a useful technique to have in your arsenal when pitting olives.

Pros
- Can be a quick and efficient way to pit olives
- No additional equipment needed, as most kitchens already have a skimmer spoon
- Can be easier on the hands and fingers compared to using a knife or other manual methods
Cons
- Can be messy, as olive oil may splatter while using the skimmer spoon
- Requires a bit of skill and technique to split the olive without damaging the flesh or the pit
- Not suitable for larger olives or firmer varieties
6. Straw Method
- Efficiency Level: LOW
- Best for Olive types: Small
Using a sturdy straw to remove olive pits is possible. This works best if you use a stainless steel metal or eco bamboo straw rather than a thin plastic straw. The plastic straw is too soft and won’t work, it literally bends over and breaks.
Here’s step-by-step instructios on how to do it:
- Step 1: Hold the olive firmly or place it on the top of a suitable empty bottle if your olives are larger in size (for example, Kalamata olives).
- Step 2: Use a sturdy straw, such as a stainless steel metal or eco bamboo straw, and insert it through the spot where the stem attaches to the olive until you hit the pit.
- Step 3: Push the pit right out the other side of the olive using the straw.
If you’re using a bottle, and it’s the right size, you should end up with a bottle filled with pits and a nice pile of olives. This method is perfect for softer olives and is great if you don’t have any other tools on hand.

Pros
- Cheap and easily available in most households.
- Can work well for small or soft olives.
Cons
- Not effective for larger or firmer olives.
- Requires some force and can be tiring for the hands.
- Not the most sanitary method, as the straw may not be cleaned thoroughly.
7. Decorating or Pastry Tip
- Efficiency Level: LOW
- Best for Olive types: Soft and Small
If you have a decorating or pastry tip lying around, you can use it to pit olives. This method is easy and effective, especially for olives with unripe, firm textures. Here’s how to do it:
- Step 1: Insert the decorating tip into the spot where the stem attaches to the olive.
- Step 2: Working over a bowl or a bottle, push through until you feel the pit.
- Step 3: Forcefully push it continuously until the pit pops out.
If you’re working with unripe and firm-textured olives, it helps to push against a cutting board.
This is one of my favorite methods to use a pastry tip because I slide the wide end on my thumb like a thimble and push the pits out using the pointy end!

Last update on 2026-06-23 / Affiliate links / Images from Amazon Product Advertising API
Pros
- Allows for quick and precise pitting
- Can be easily used for small and delicate olives
- No need to apply too much force, which reduces the risk of damaging the olive
Cons
- Requires a specific tool (decorating or pastry tip)
- Not suitable for larger or firmer olives
- Can be challenging to clean the tool properly after use.
8. Tweezers
- Efficiency Level: LOW
- Best for Olive types: Soft and Small
Have you ever thought about using tweezers to pit olives? Indeed, if you have spare tweezers at home, you can use them to pit olives by grabbing the pit out. Also, this tool can make the job of pitting olives much quicker comparing using a paperclip.
To pit olives using tweezers, hold the olive securely between your thumb and forefinger. Then, use the tweezers to grasp the pit and pull it out gently. If the pit is difficult to remove, you may need to wiggle it back and forth or use the tip of the tweezers to loosen it from the flesh.
It is important to use tweezers with a fine tip, as thicker or blunt tweezers may damage the olive. Additionally, be sure to wash the tweezers thoroughly before and after use to avoid contamination.
This method can be time-consuming and may not be suitable for larger or firmer varieties of olives. I tried tweezers for Kalamata olives and it was quite difficult to separate the pit from the flesh since kalamata olives are large with large pits. So for this method is better to use fully ripe small olives like Koroneiki, Lianolia, Tsounati.

Pros
- Tweezers can make the job of pitting olives much quicker compared to other non-tool methods like using your fingers or a paperclip.
- They are easily accessible and most people have a pair at home.
- Using tweezers allows for a higher degree of precision and control when removing the pit.
Cons
- It can be difficult to separate the pit from the flesh, especially for larger olives with larger pits.
- It may not be as efficient as using a specialized tool like an olive or cherry pitter.
- Using tweezers can be tedious and may require some skill and practice to get the hang of it.
9. Paperclip
- Efficiency Level: LOW
- Best for Olive types: Soft and Small
Some people swear by the paper clip method to remove cherry pits, but should you try it with olives? This involves partially unwinding the paperclip into a shape “s” and then pushing it in to free the pit from inside the olive by moving it around. You can then either hook the pit and pull it out or push it all the way through.
This is unlikely to be the easiest or cleanest way of removing pits, and you may find it more time-consuming than you’d like.
Furthermore, using a paperclip for olives can be tricky due to the size and texture of olives. Unlike cherries, which are relatively soft and small, olives are larger and firmer, which can make it difficult to maneuver the paperclip inside the olive.
In addition, using a paperclip may not be very efficient and can leave the olive looking less appealing than other methods. It also requires some skill to avoid damaging the olive in the process. Overall, while the paperclip method may work for some, there are likely easier and more effective ways to pit olives.
Pros
- It’s a cheap and easily accessible tool that you probably already have at home.
- It’s small and portable, so you can use it on the go or while traveling.
- It can work for smaller olives with softer flesh.
Cons
- It’s not very efficient for larger or firmer olives.
- It can be time-consuming and tedious to use.
- It requires a bit of skill and practice to get the hang of using it effectively.
- It may not be the most hygienic method, especially if the paperclip is not clean.
IV. Preserving and Storing Pitted Olives
If you’ve gone through the effort of pitting your olives, you’ll want to make sure to preserve and store them properly so that they retain their delicious taste and texture. Here are a few methods for preserving and storing pitted olives.
Brining
Brining is a classic method of preserving olives that involves soaking them in a saltwater solution. This not only helps to preserve the olives but also removes their bitterness.
To brine olives, mix 1/4 cup of salt per quart of water and stir until the salt dissolves. Add the pitted olives to the brine, making sure they are completely submerged, and let them sit at room temperature for several days, stirring occasionally.
Once the olives have lost their bitterness and the brine tastes salty, transfer them to an airtight container and store in the refrigerator.
Storing in Oil
Storing pitted olives in oil can help keep them moist and add extra flavor.
To store olives in oil, place them in a jar and pour olive oil over them until they are completely submerged. You can also add herbs, garlic, or other flavorings to the oil for added taste. Store the jar in the refrigerator and use the olives within a few weeks.
Freezing
Freezing is another option for preserving pitted olives. Simply place the pitted olives in a freezer-safe container and cover with water. Seal the container and freeze for up to 6 months. Thaw the olives in the refrigerator before using.
Storing Tips
When it comes to storing pitted olives, it’s important to keep them in an airtight container to prevent them from drying out or absorbing unwanted flavors. A glass jar with a tight-fitting lid works well for this purpose. It’s also important to keep pitted olives refrigerated to ensure their freshness and prevent spoilage. They can last for several weeks in the refrigerator if stored properly.
V. Using Pitted Olives
Pitted olives are a versatile ingredient that can be used in a wide variety of recipes or enjoyed on their own as a tasty snack. Here are a few ideas for using pitted olives:
Salads
Pitted olives make a great addition to salads of all kinds, adding a salty and tangy flavor to the mix. Try tossing them into a Greek salad with feta cheese, cucumber, and tomato, or sprinkle them on top of a simple mixed greens salad.
Pasta Dishes
Olives can add a burst of flavor to pasta dishes. Toss them into your favorite spaghetti or linguine recipe with olive oil, garlic, and fresh herbs for a quick and easy meal.
Pizza Toppings
Pitted olives make a delicious pizza topping. Try adding them to a classic Margherita pizza or experiment with different toppings to create your own unique pizza creation.
Appetizers
Pitted olives make a great addition to any appetizer platter. Try pairing them with cheese and crackers or as a topping on crostini with goat cheese and roasted red peppers.
Snack
Pitted olives make a great snack on their own. Try marinating them in olive oil and herbs for extra flavor or enjoy them plain as a healthy and satisfying snack.
With these suggestions, you can get creative with how you use pitted olives in your cooking and snacking. So, go ahead and experiment with different recipes and preparations to discover new and delicious ways to enjoy this versatile ingredient!
Looking for a Personalized Gift?
Adopt an OLIVE TREE in Greece –
Receive Premium Olive Oil!
VI. Frequently Asked Questions
How to Pit Olives for Stuffing?
When you are preparing olives for stuffing, you want a nicely removed pit from the fruit and for this reason, the best option is olive pitter. If you don’t have a pitter at home, try to use a metal straw or a decorating/pastry tip and push the pits out.
What is the Easiest Way to Pit Kalamata Olives?
Kalamata olives are large with smooth texture olives, so the easiest way to pit Kalamata olives is to use olive pitter. It’s the most efficient method. However, if you don’t have this tool at home, you can use a knife or metal straw to pop out the pits.
Can I Use a Cherry Pitter to Pit Olives?
Yes, you can use a cherry pitter to pit olives and vice versa. Typically pitters are simple mechanisms made from stainless steel and work perfectly for both cherries and olives.
What type of olives work best for pitting with a cherry or olive pitter?
The best types of olives for pitting with a cherry or olive pitter are larger, meatier olives such as Kalamata, Manzanilla, or Cerignola.
Is it necessary to use a specialized tool like a pitter to remove the pit from an olive?
No, it is not necessary to use a specialized tool like a pitter to remove the pit from an olive. You can also use a knife, pot or pan, skimmer spoon, straw, decorating or pastry tip, tweezers, or even your fingers.
How long can pitted olives be stored for?
Pitted olives can be stored for up to two weeks in the refrigerator in an airtight container with their brine or olive oil. They can also be frozen for up to six months.
Can I use a paperclip to pit olives?
While some people have had success using a paperclip to pit olives, it is not the easiest or most efficient method and may be more time-consuming than other methods.
What is the easiest method for pitting olives?
The easiest method for pitting olives varies based on personal preference and the type of olives being pitted. Using a cherry or olive pitter or a specialized olive pitter may be the quickest and most efficient method, but other methods such as using a knife, pot or pan, or even your fingers can also work well.
VII. Final Thoughts
In summary, there are many methods for pitting olives that range from using basic kitchen tools to specialized equipment. Each method has its pros and cons, and the best option for you will depend on the type of olive you are working with, your personal preference, and the tools you have available.
If the olive is unripe, the flesh is hard and sticks to the pit. In that case, it would be difficult to remove pits with fingers or paperclips, so better to use olive pitter. If you don’t already have an olive pitter, a large bladed knife is likely to be your best option.
However, if olives are fully ripe, they have a softer texture and will pop out their pits with less of a struggle by using a knife, paperclip or your fingers.
Also, the method you use to pit olives at home depends on the olive cultivar. For example, Koroneiki olives are very small olives so it’s easier to use olive pitter for this job or a knife. Though Kalamata olives are one of the largest and you can apply various methods to remove the pits.
Don’t hesitate to try a few of these methods above while pitting olives at home and let me know which way you enjoyed the most and why!
Read Next

Learn More
- Why Kalamata Olives are the Healthiest?
- Kalamata Olives vs Black Olives
- Are Canned Olives Good for You?
Hi, I’m Vangelis, the founder of Oliviada and an established olive oil expert from Kalamata, Greece. My expertise isn’t just in producing quality Extra Virgin Olive Oil, but also in the cultivation and care of olive trees themselves. I am deeply committed to sharing my knowledge and know-how, helping others understand the intricacies of olive tree growing and the creation of quality olive oil.